¶ Working with USRP X310 and GNU Radio
Transmit and receive a 1 MHz cosine over the air between two USRP X310 radios on Sandbox 2 using GNU Radio Companion flowgraphs, and observe the received spectrum in real time with a QT GUI Frequency Sink.
¶ Overview
This tutorial uses two USRP X310 radios on COSMOS Sandbox 2 to transmit and receive a single frequency over the air, demonstrating how to use UHD (USRP Hardware Driver) together with GNU Radio Companion (GRC) to build and run signal-processing flowgraphs.
On the transmitting node (node1-1), a Signal Source block generates a 1 MHz cosine at a 10 Msps sample rate, which is fed into a UHD USRP Sink block and sent to the USRP X310 for RF transmission. On the receiving node (node1-2), a UHD USRP Source block captures samples from its X310 and feeds them into a QT GUI Frequency Sink, displaying the live spectrum in a forwarded X11 window.
The tutorial covers network interface configuration (the X310 communicates over a 10 Gbps Ethernet link), verifying device discovery with uhd_find_devices, building both flowgraphs from scratch in GNU Radio Companion, and running the end-to-end experiment. A troubleshooting section covers two common errors: an xterm warning and an FPGA compatibility mismatch.
¶ Learning outcomes
After completing this tutorial you will be able to:
- Configure a node's 10 Gbps Ethernet interface to communicate with a USRP X310 at
192.168.40.2. - Verify radio discovery with
uhd_find_devices. - Build a GNU Radio Companion transmitter flowgraph using a Signal Source and a UHD USRP Sink.
- Build a GNU Radio Companion receiver flowgraph using a UHD USRP Source and a QT GUI Frequency Sink.
- Run the two flowgraphs end-to-end and observe a received tone at 1 MHz offset in the frequency-domain display.
¶ At a glance
| Difficulty | Beginner |
| Estimated time | 60 min |
| Domain / sandbox | sb2.cosmos-lab.org (USRP X310 nodes) |
| Topic group | SDR & GNU Radio |
| Last verified | Not re-tested (migrated 2026-06-20) |
¶ Prerequisites
Background knowledge
- The six-step experiment life cycle.
- Basic RF concepts (carrier frequency, sample rate, frequency spectrum).
- Familiarity with SSH X11 forwarding (required to display GNU Radio Companion on your local machine).
Account & access
- A COSMOS account — register here.
- An approved reservation on sb2.cosmos-lab.org — see Make a reservation.
- SSH access with X11 forwarding to the console — see SSH access.
¶ Resources required
Devices / nodes
| Resource | Role | Qty | Notes |
|---|---|---|---|
| node1-1 | Transmitter | 1 | USRP X310 connected via 10 GbE; default USRP IP 192.168.40.2 |
| node1-2 | Receiver | 1 | USRP X310 connected via 10 GbE; default USRP IP 192.168.40.2 |
Disk images
| Image | Load onto | Provides |
|---|---|---|
| ubuntu1804-uhd3.15-gr3.8.ndz | node1-1, node1-2 | Ubuntu 18.04 with UHD 3.15.0 and GNU Radio 3.8 preinstalled |
Software components
| Component | Version | Source |
|---|---|---|
| UHD (USRP Hardware Driver) | 3.15.0 | preinstalled in ubuntu1804-uhd3.15-gr3.8.ndz |
| GNU Radio / GNU Radio Companion | 3.8 | preinstalled in ubuntu1804-uhd3.15-gr3.8.ndz |
Spectrum / RF — over-the-air transmit inside Sandbox 2; example uses a carrier of TODO: verify and a 1 MHz cosine waveform at 10 Msps. Keep gains within your reservation's allowed limits.
¶ Topology
Two Sandbox 2 nodes, each physically connected to one USRP X310 over a dedicated 10 Gbps Ethernet link. Each node's interface enp1s0 is configured as 192.168.40.1/24 so it can reach the X310 at 192.168.40.2. node1-1 transmits; node1-2 receives. Both nodes are controlled from the Sandbox 2 console, and GNU Radio Companion windows are displayed on the experimenter's local machine via X11 forwarding.
¶ Setup
-
Reserve Sandbox 2 and log into the console with X11 forwarding (
-X; use-Yon macOS):ssh -X <username>@console.sb2.cosmos-lab.org -
Make sure both nodes are off before imaging:
omf tell -a offh -t node1-1,node1-2 -
Load the SDR image onto both nodes:
omf load -i ubuntu1804-uhd3.15-gr3.8.ndz -t node1-1,node1-2Note: imaging runs sequentially per node. Wait for the first node to complete before the second is started. OMF handles this automatically when both targets are specified together.
-
Turn the nodes on:
omf tell -a on -t node1-1,node1-2 -
Give the nodes about a minute to boot, then open two additional SSH sessions (both with X11 forwarding) from your local machine to the console, and from there SSH into each node:
Session A — node1-1 (transmitter):
ssh -X <username>@console.sb2.cosmos-lab.org ssh -X root@node1-1Session B — node1-2 (receiver):
ssh -X <username>@console.sb2.cosmos-lab.org
ssh -X root@node1-2
¶ Instructions
¶ Step 1 — Configure the node↔USRP network interface
The USRP X310 uses a default IP address of 192.168.40.2 on its first 10 Gbps interface. You must configure enp1s0 on each node to 192.168.40.1/24 so the node can reach it.
Perform the following on both nodes (substitute node1-X with node1-1 or node1-2):
root@node1-X:~# cd /etc/netplan/
root@node1-X:/etc/netplan# rm -rf 00-netplan-ifrename.yaml
root@node1-X:/etc/netplan# systemctl disable ifrename.service
root@node1-X:/etc/netplan# cp 00-netplan.yaml.bak 00-netplan.yaml
root@node1-X:/etc/netplan# nano 00-netplan.yaml
Add the following lines to the end of the file (indentation matters — use spaces, not tabs):
        enp1s0:
          dhcp4: false
          addresses: [192.168.40.1/24]
The complete netplan file should look like this:
network:
  version: 2
  renderer: networkd
  ethernets:
    wired:
      match:
        name: en*
      dhcp4: true
      optional: true
    enp1s0:
      dhcp4: false
      addresses: [192.168.40.1/24]
Apply the configuration:
root@node1-X:/etc/netplan# netplan apply
Exit to the console and reboot the node so the netplan settings are fully applied:
root@node1-X:/etc/netplan# exit
username@console:~$ omf tell -a reset -t node1-X
username@console:~$ ssh -X root@node1-X
Install net-tools and verify the interface is configured correctly:
root@node1-X:~# apt install net-tools
root@node1-X:~# ifconfig
Expected output (abbreviated):
enp1s0: flags=4163<UP,BROADCAST,RUNNING,MULTICAST>  mtu 1500
        inet 192.168.40.1  netmask 255.255.255.0  broadcast 192.168.40.255
        inet6 fe80::f652:14ff:fe83:b720  prefixlen 64  scopeid 0x20<link>
        ether f4:52:14:83:b7:20  txqueuelen 1000  (Ethernet)
        RX packets 9224307  bytes 553530800 (553.5 MB)
        RX errors 0  dropped 0  overruns 0  frame 0
        TX packets 118792339  bytes 155610874575 (155.6 GB)
        TX errors 0  dropped 0 overruns 0  carrier 0  collisions 0
By setting enp1s0 to 192.168.40.1/24, the node can reach the USRP X310 at 192.168.40.2.
¶ Step 2 — Verify USRP discovery
On each node, confirm UHD can find the radio:
root@node1-X:~# uhd_find_devices
Expected output:
[INFO] [UHD] linux; GNU C++ version 7.5.0; Boost_106501; UHD_3.15.0.0-release
--------------------------------------------------
-- UHD Device 0
--------------------------------------------------
Device Address:
    serial: 30F10F9
    addr: 192.168.40.2
    fpga: XG
    name:
    product: X310
    type: x300
If you see No UHD Devices Found, see Troubleshooting. Do not continue until uhd_find_devices succeeds on both nodes.
¶ Step 3 — Set up GNU Radio environment
Run the following commands on both nodes to point GNU Radio to the correct Python installation directories:
root@node1-X:~# export PYTHONPATH=/usr/local/lib/python3/dist-packages/:$PYTHONPATH
root@node1-X:~# export LD_LIBRARY_PATH=/usr/local/lib/:$LD_LIBRARY_PATH
Set the network card read and write buffer sizes to their maximum:
root@node1-X:~# sudo sysctl -w net.core.wmem_max=24862979
root@node1-X:~# sudo sysctl -w net.core.rmem_max=24862979
¶ Step 4 — Build the transmitter flowgraph on node1-1
Start GNU Radio Companion on node1-1 (the X11 window opens on your local machine):
root@node1-1:~# gnuradio-companion
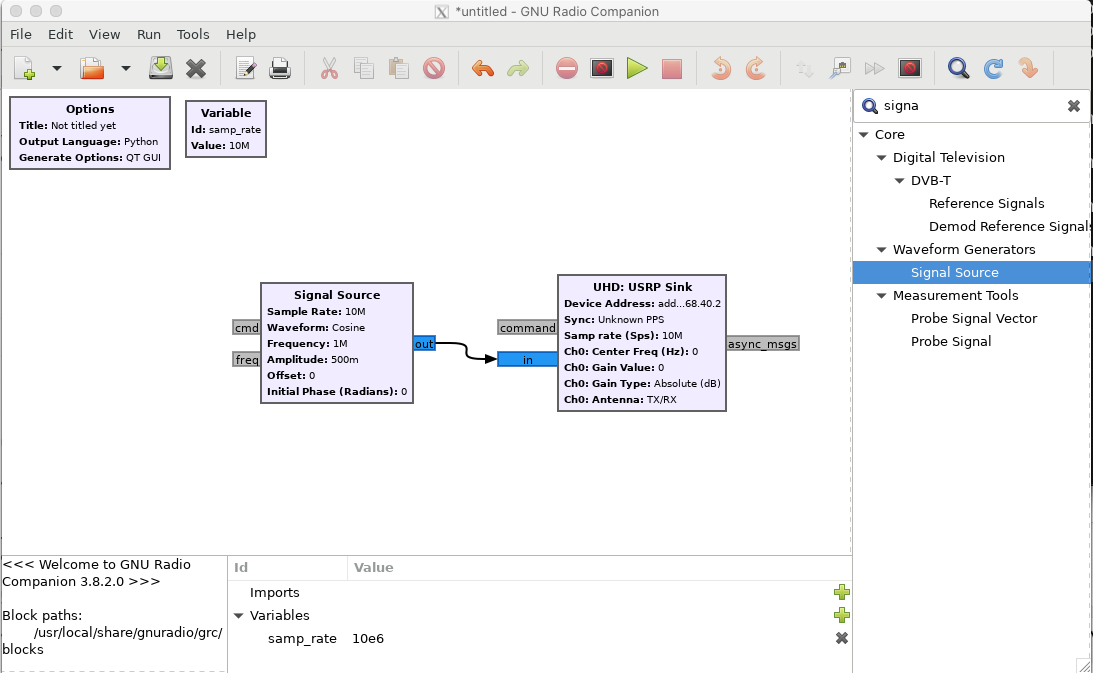
Build a flowgraph that contains:
- An Options block
- A Signal Source block → generates a 1 MHz cosine at the flowgraph sample rate
- A UHD: USRP Sink block → sends samples to the X310 for transmission
You can add blocks by clicking the magnifying glass to open the search bar, then dragging the block into the flowgraph or double-clicking to place it. To connect blocks, click a blue port and drag to another.
Double-click each block to set its parameters. The key values are:
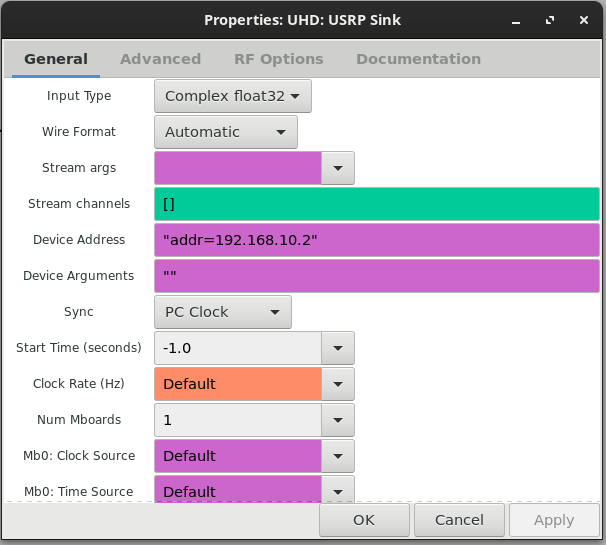
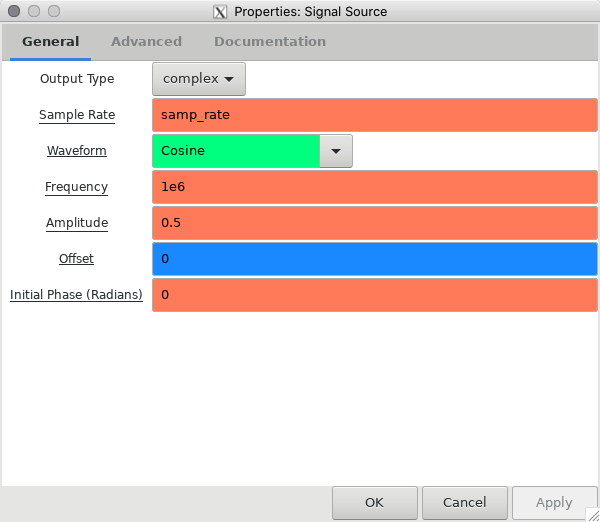
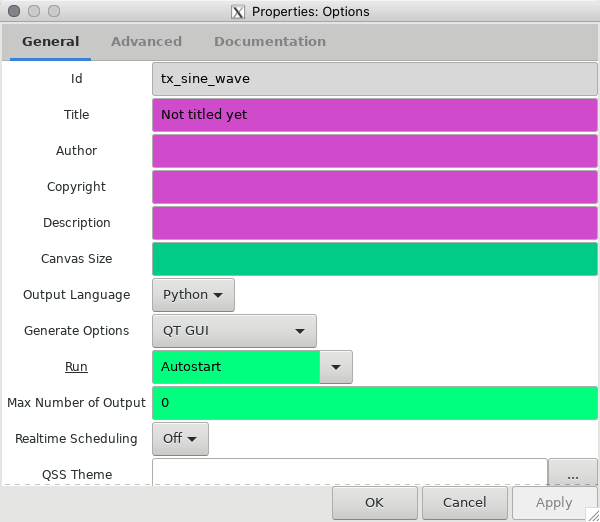
Key parameter summary (based on source description):
| Block | Parameter | Value |
|---|---|---|
| Variable / Options | samp_rate |
10e6 (10 Msps) |
| Signal Source | Frequency | 1e6 (1 MHz cosine) |
| Signal Source | Waveform | Cosine |
| Signal Source | Sample rate | samp_rate |
| UHD: USRP Sink | Device Address | addr=192.168.40.2 |
| UHD: USRP Sink | Sample rate | samp_rate |
After entering all parameters, press the green Run button. Save the flowgraph when prompted as x310_tx.grc. The flowgraph will open a small blank GUI window (no GUI sink blocks are used here); to stop it, close that window.
¶ Step 5 — Build the receiver flowgraph on node1-2
Start GNU Radio Companion on node1-2:
root@node1-2:~# gnuradio-companion
Build a flowgraph that contains:
- An Options block
- A UHD: USRP Source block → receives samples from the X310
- A QT GUI: Frequency Sink block → displays the live frequency spectrum
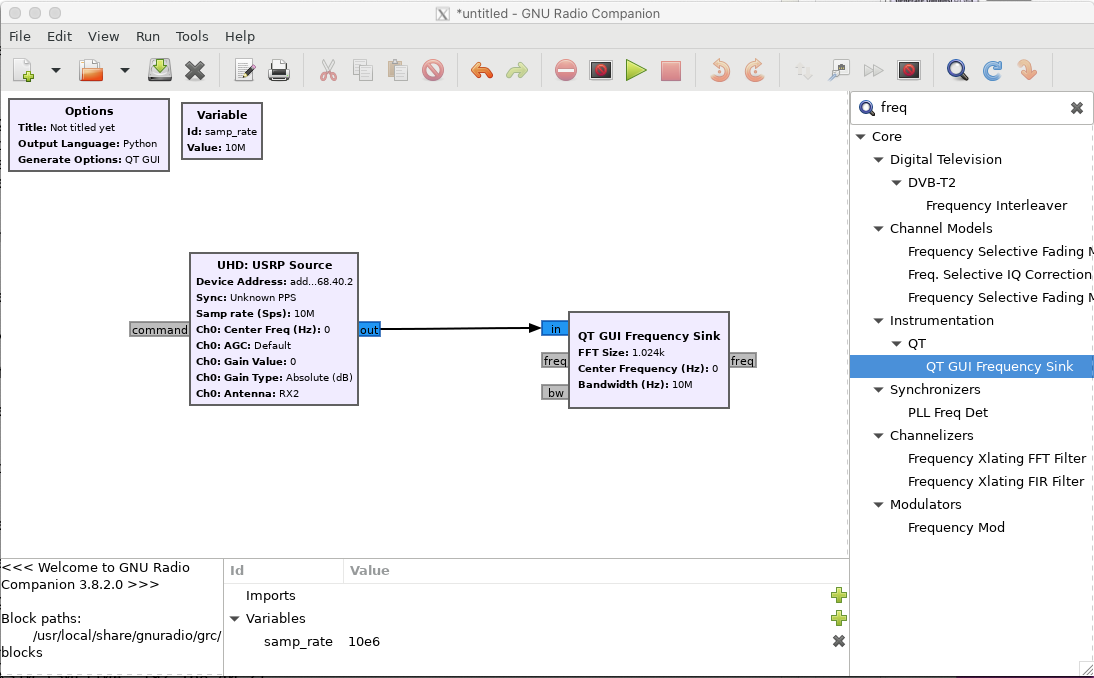
Set the parameters as follows:
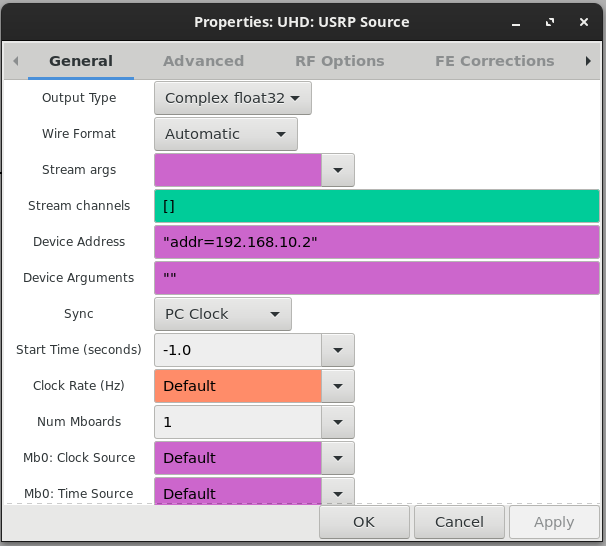
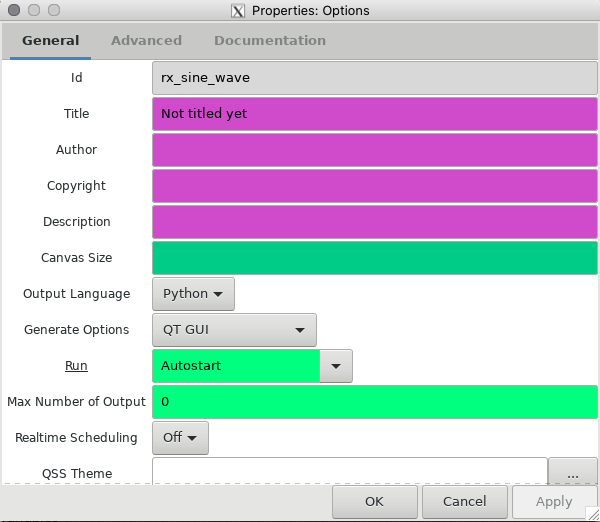
Key parameter summary:
| Block | Parameter | Value |
|---|---|---|
| Variable / Options | samp_rate |
10e6 (10 Msps) |
| UHD: USRP Source | Device Address | addr=192.168.40.2 |
| UHD: USRP Source | Sample rate | samp_rate |
Once all parameters are set (remember to configure samp_rate), press Run and save as x310_rx.grc. After a short delay, a small spectrum display GUI window will appear.
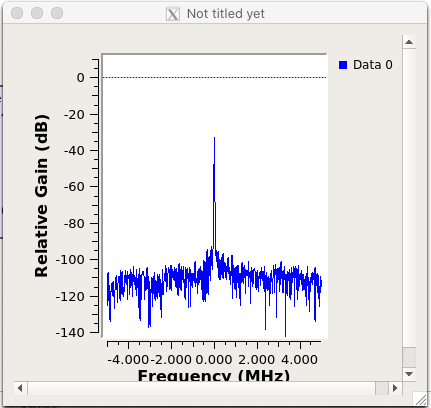
A strong peak at zero frequency may appear; this is typically a DC offset on the received signal and can be ignored.
¶ Step 6 — Run the experiment end-to-end
Start the receiver first, then the transmitter:
-
On node1-2: run
x310_rx.grcusing the green Run button. Observe the baseline spectrum (noise floor with possible DC spike at 0 Hz). -
On node1-1: run
x310_tx.grcusing the green Run button.
If everything is working correctly, the receiver spectrum display on node1-2 will now show two peaks at ±1 MHz offset from the centre frequency — the transmitted 1 MHz cosine.
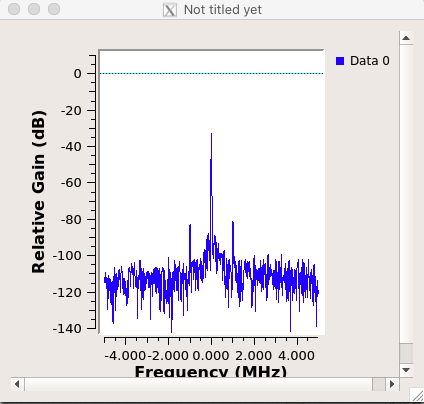
Now try other things: replace the QT GUI Frequency Sink with a QT GUI Time Sink to observe the signal in the time domain, or change the Signal Source waveform (square, sawtooth, etc.) to see how harmonics appear in the spectrum.
¶ Verification
uhd_find_devicesreturns the X310 (addr: 192.168.40.2,type: x300) on both nodes.ifconfigshowsenp1s0withinet 192.168.40.1and netmask255.255.255.0.- With the transmitter not running, node1-2's QT GUI Frequency Sink shows only noise (and a possible DC spike at 0 Hz).
- With the transmitter running, the receiver display shows two distinct peaks at ±1 MHz from the centre frequency.
- Stopping the transmitter causes the ±1 MHz peaks to collapse back to the noise floor.
¶ Cleanup
omf tell -a offh -t node1-1,node1-2
(No omf save needed unless you modified the image.)
¶ Troubleshooting
| Symptom | Likely cause | Fix |
|---|---|---|
uhd_find_devices → No UHD Devices Found |
enp1s0 not configured or netplan not applied |
Run ifconfig; confirm inet 192.168.40.1. If not set, reapply netplan or set manually. Then ping 192.168.40.2 to confirm USRP is reachable. |
| GNU Radio Companion window does not appear | X11 forwarding not enabled | Reconnect with ssh -X (or ssh -Y on macOS) through all hop levels (local → console → node). |
| xterm executable not found error in GRC | Missing xterm binary | Ignore it; it has no effect on flowgraph operation. |
| FPGA compatibility mismatch error | FPGA image on X310 is a different revision than UHD expects | See detailed fix below. |
| DC spike at 0 Hz in receiver spectrum | DC offset in the received signal | Expected behaviour; ignore it for this tutorial. |
FPGA compatibility mismatch — detailed fix
If you see:
[INFO] [X300] X300 initialization sequence...
Error: RuntimeError: Expected FPGA compatibility number 38, but got 36:
The FPGA image on your device is not compatible with this host code build.
Download the appropriate FPGA images for this version of UHD.
Please run:

 "/usr/local/lib/uhd/utils/uhd_images_downloader.py"

Then burn a new image to the on-board flash storage of your
USRP X3xx device using the image loader utility. Use this command:

"/usr/local/bin/uhd_image_loader" --args="type=x300,addr=192.168.40.2"

For more information, refer to the UHD manual:

 http://files.ettus.com/manual/page_usrp_x3x0.html#x3x0_flash
Download the matching FPGA images and flash the X310:
root@node1-X:~# /usr/local/lib/uhd/utils/uhd_images_downloader.py
root@node1-X:~# /usr/local/bin/uhd_image_loader --args="type=x300,addr=192.168.40.2"
Expected output from the loader:
[INFO] [UHD] linux; GNU C++ version 7.5.0; Boost_106501; UHD_4.0.0.0-25-g1a34ba8a
Unit: USRP X310 (30F110A, 192.168.40.2)
FPGA Image: /usr/local/share/uhd/images/usrp_x310_fpga_HG.bit
-- Initializing FPGA loading...successful.
-- Loading HG FPGA image: 0% (0/121 sectors)
WARNING: Do NOT interrupt or disconnect from the node while FPGA loading is in progress. An incomplete FPGA flash will brick the USRP X310 permanently.
When the loader completes, exit the node and power-cycle it from the console:
root@node1-X:~# exit
username@console:~$ omf tell -a offh -t node1-X
Wait a moment, then:
username@console:~$ omf tell -a on -t node1-X
SSH back in and re-configure the network interface (Step 1) before continuing. Note that flashing the USRP FPGA is completely different from imaging a node with a .ndz file: node imaging overwrites the node's hard drive, while FPGA loading writes a new circuit configuration to the USRP's on-board flash EEPROM.
¶ References
- Available SDR / USRP hardware
- Sandbox 2 hardware details
- Six-step experiment life cycle
- UHD documentation
- GNU Radio documentation
- USRP X310 UHD manual
Author(s): COSMOS team · Last verified: Not re-tested (migrated 2026-06-20) · Tested image/release: ubuntu1804-uhd3.15-gr3.8.ndz · Tags: sdr, uhd, gnuradio, usrp, x310, gnuradio-companion